
Supercharging Android Apps With TensorFlow (Google's Open Source Machine Learning Library)
Discussion: Reddit r/Android (80 points, 16 comments)

In November 2015, Google announced and open sourced TensorFlow, its latest and greatest machine learning library. This is a big deal for three reasons:
- Machine Learning expertise: Google is a dominant force in machine learning. Its prominence in search owes a lot to the strides it achieved in machine learning.
- Scalability: the announcement noted that TensorFlow was initially designed for internal use and that it’s already in production for some live product features.
- Ability to run on Mobile.
This last reason is the operating reason for this post since we’ll be focusing on Android. If you examine the tensorflow repo on GitHub, you’ll find a little tensorflow/examples/android directory. I’ll try to shed some light on the Android TensorFlow example and some of the things going on under the hood.
A Look of Recognition
The app glances out through your camera and tries to identify the objects it sees. Sometimes it does a good job, other times it can’t quite pin down the object, and at times it leads to thought provoking guesses! Overall, it feels pretty magical.
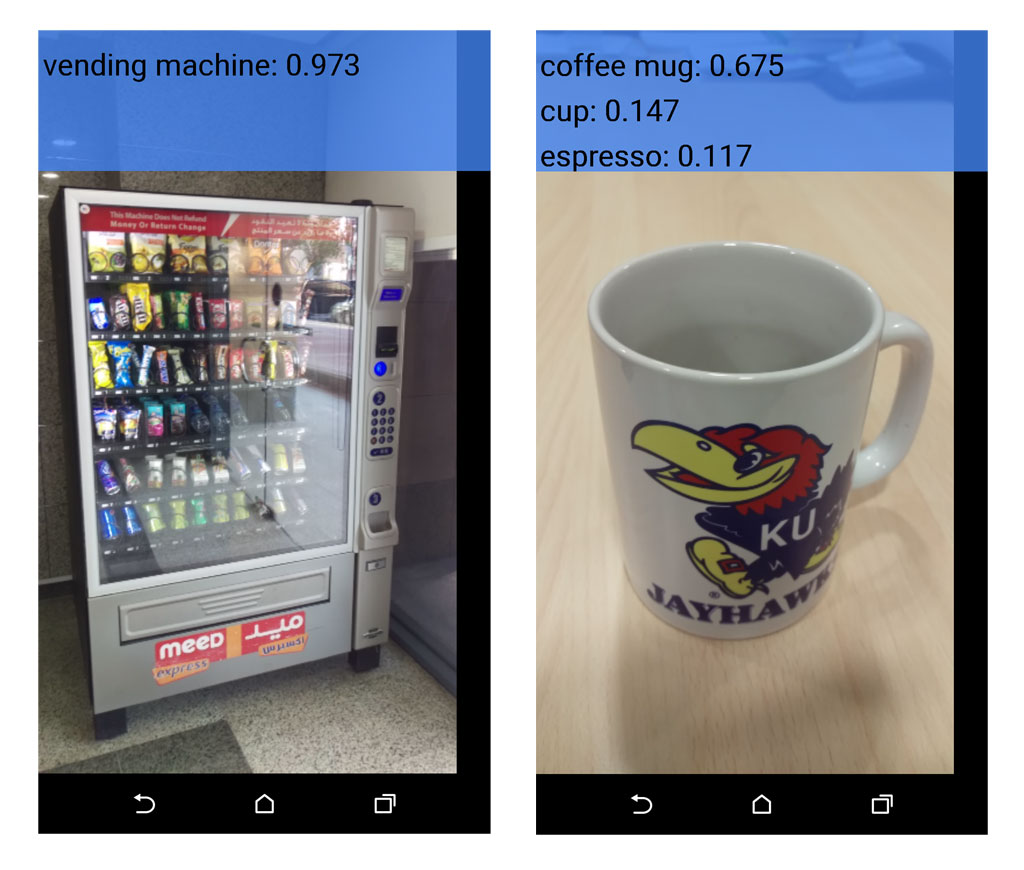
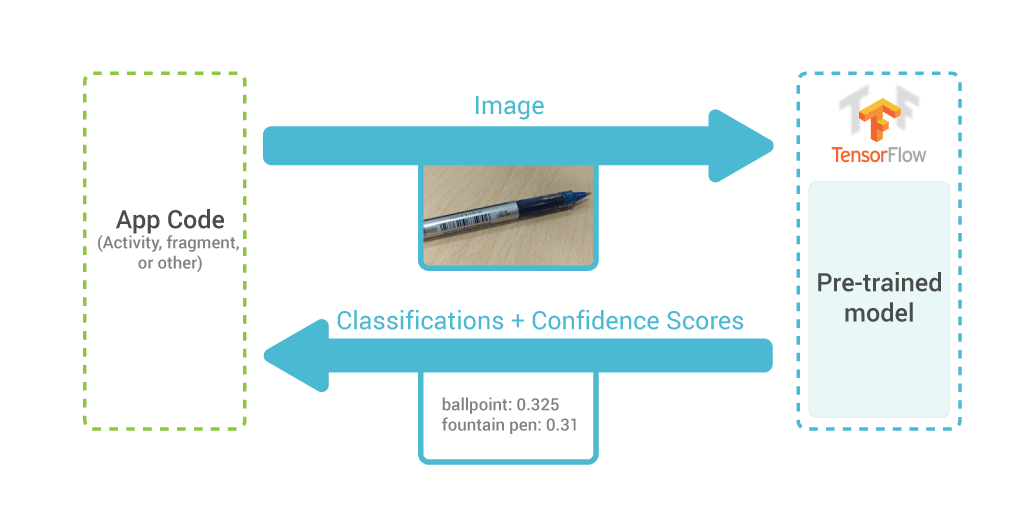
The app accomplishes this feat using a bundled machine learning model running in TensorFlow on the device (no network calls to a backend service). The model is trained against millions of images so that it can look at the photos the camera feeds it and classify the object into its best guess (from the 1000 object classifications it knows). Along with its best guess, it shows a confidence score to indicate how sure it is about its guess.
The Android example page gives you an idea on how to build the app, and ultimately culminates in producing this APK (I built and uploaded the APK to save you some time since the building process requires installing the Android NDK and Bazel, Google’s build tool).
NOTE: Android 5.0 or later required since the example uses the Camera2 package introduced in Android 5.0.
NOTE: if your device runs Android 6.0 or later, you have to install the app with the following command (It gives the app the appropriate permissions it needs to run):
adb install -r -g /path/to/apk.apk
App Structure Walkthrough
The core TensorFlow engine is built with C++, but programmers can write their TensorFlow software in either C++ or Python. The Android TensorFlow example uses the C++ interface in the following manner:
- On startup, the app launches an Android activity (CameraActivity.java) which then starts a fragment (CameraConnectionFragment.java)
- The fragment does some setup to basically start the camera and feed the incoming stream of images to an object it instantiates (TensorflowImageListener.java)
- The listener consults the classifier (TensorflowClassifier.java) about each image it gets, and receives the classification and confidence score for each image.
The good thing is that most of this logic is in normal Android Java SDK territory – so this should be familiar to most Android devs. So where is the C++?
If you look closely at TensorflowClassifier, you may notice the following methods:
	public native int initializeTensorflow( );

	private native String classifyImageBmp(Bitmap bitmap);
The native keywords in these method signatures indicate that these methods are implemented in native C++ code. Look for them under the “android/jni” directory and true enough, you’ll find tensorflow_jni.cc
	JNIEXPORT jint JNICALL
	TENSORFLOW_METHOD(initializeTensorflow)(...) {
    ...
    }


	JNIEXPORT jstring JNICALL
	TENSORFLOW_METHOD(classifyImageBmp)(...) {
    ...
    }
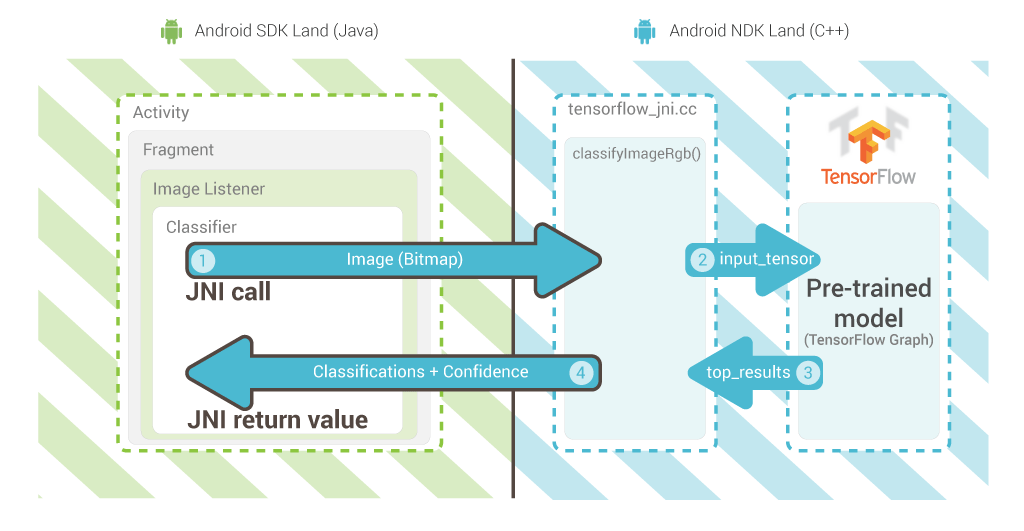
JNI (short for Java Native Interface) is a way in which the Java parts of an Android app can communicate with the native C++ parts. So when we call classifyImageBmp(bitmap) in our Java code, it will actually invoke the C++ function exported in tensorflow_jni.cc and return the value it returns.
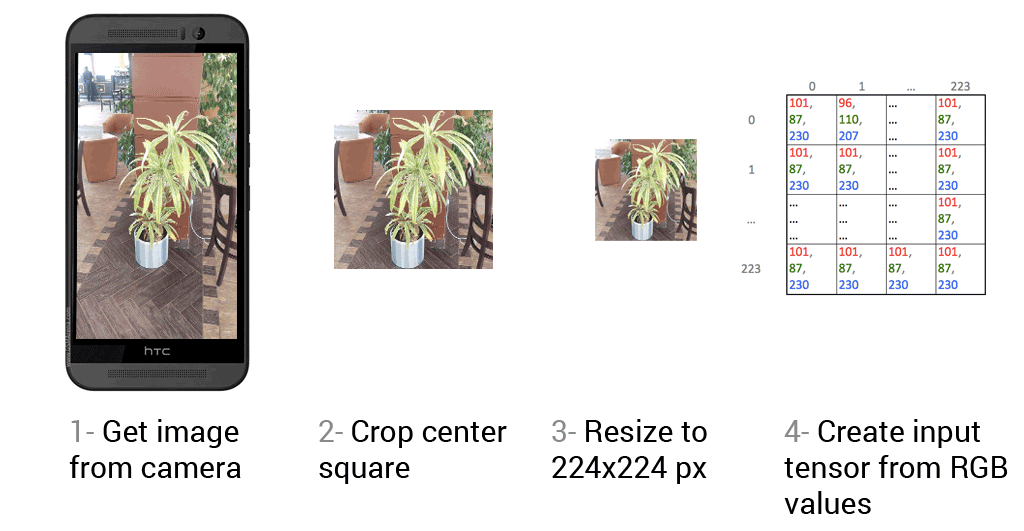
A Bitmap file cannot directly be sent to TensorFlow as input. It has be transformed into an input tensor that we’d send in step #2 in the flow above. A tensor is an n-dimensional array of values, and is the motif TensorFlow uses to send data between all of its different parts/operations. This model expect a 3-dimensional array that supplies the Red/Green/Blue value of each pixel in the image. The dimensions are:
- X-index of the pixel
- Y-index of the pixel
- indication of which value this cell holds (0 for red, 1 for green, 2 for blue)
And the value of the cell would be the actual value of R or G or B channel for that pixel.
(This is somewhat oversimplified. I glanced over two things for simplicity’s sake. First is the conversion from the YUV format that the Android camera exports to the RGB format the model expects. Second is that the model actually takes a 4-dimensional tensor, but these three are the ones we care about)
The Model
As you read the example’s README.md, you’ll notice that it instructs you to download a zip file containing the TensorFlow model and add it to the assets directory. This zip file contains two files that are important for us:
-
tensorflow_inception_graph.pb- At 54 MBs unzipped, this file constitutes the majority of the APK size (58 MBs). This is our trained machine learning model and where the magic comes from. It’s a pre-built TensorFlow Graph describing the exact operations needed to compute a classification from input image data. This Graph is serialized and encoded into binary with Google’s Protocol Buffers so it can be deserialized across different platforms (think of it as a binary-encoded JSON file). -
imagenet_comp_graph_label_strings.txt- this contains the 1000 classifications that the output of the model corresponds to (e.g. “vending machine”, “water bottle”, “coffee mug”). These classifications are defined by the ImageNet Large Scale Visual Recognition Challenge which the model was built to compete in.
The model here is what’s known as a deep convolutional neural network. It is built in the Inception architecture described in Going Deeper with Convolutions. Convolutional neural networks are some of the most popular models in deep learning. They have been very successful in image recognition (so much so, that most highly ranked teams in the competition used them).
The model is read from the file and fed into TensorFlow when the app starts up. This code is actually really interesting to read and see how to communicate with tensorflow (if you run the app with your device connected to your computer, you can see these helpful log messages printed in logcat).
Build System
The Android app example is not built the traditional Gradle way. Because the app has to contain NDK elements as well as TensorFlow itself, a more elaborate build system was utilized. The example is configured to be built with Google’s Bazel build system running from the TensorFlow root directory.
The WORKSPACE file in the root directory specifies the main parameters of the project. The BUILD file in the Android directory instructs the build system to build the Java and C++ files of the app.
The Possibilities
Using a trained model in your app seems to be the lowest hanging fruit for mobile TensorFlow apps at the moment. While you can probably train a model on Android, mobile devices are not well suited for the intensive processing required by complex models with larger training sets.
Want to learn more about machine learning? Consider checking out the Machine Learning course on Coursera. There’s also a good discussion in /r/MachineLearning here: In your experience, which machine learning course on Coursera (or other MOOC web site) was the best?.
Want to comment? /r/androiddev, Hacker News.
